ACH User Guide
ACH allows you to send money electronically through the Automated Clearing House network to virtually any financial institution in the United States. Use the instructions below to learn how to access and navigate the ACH interface.
Accessing the ACH Module
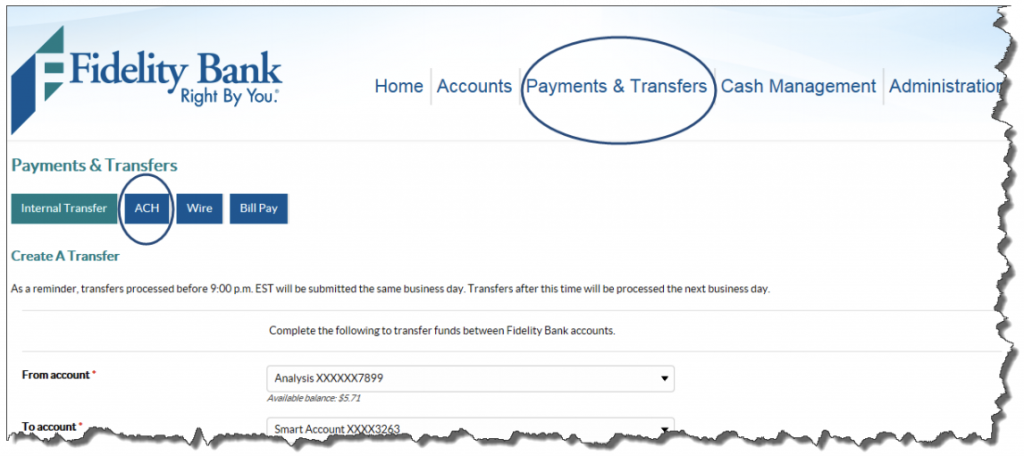
Access the ACH module in Business Advantage by selecting Payments & Transfers.
Once the page has loaded, click the ACH button.
Use the Payments & Transfers menu to access the ACH User Interface.
User Interface for ACH
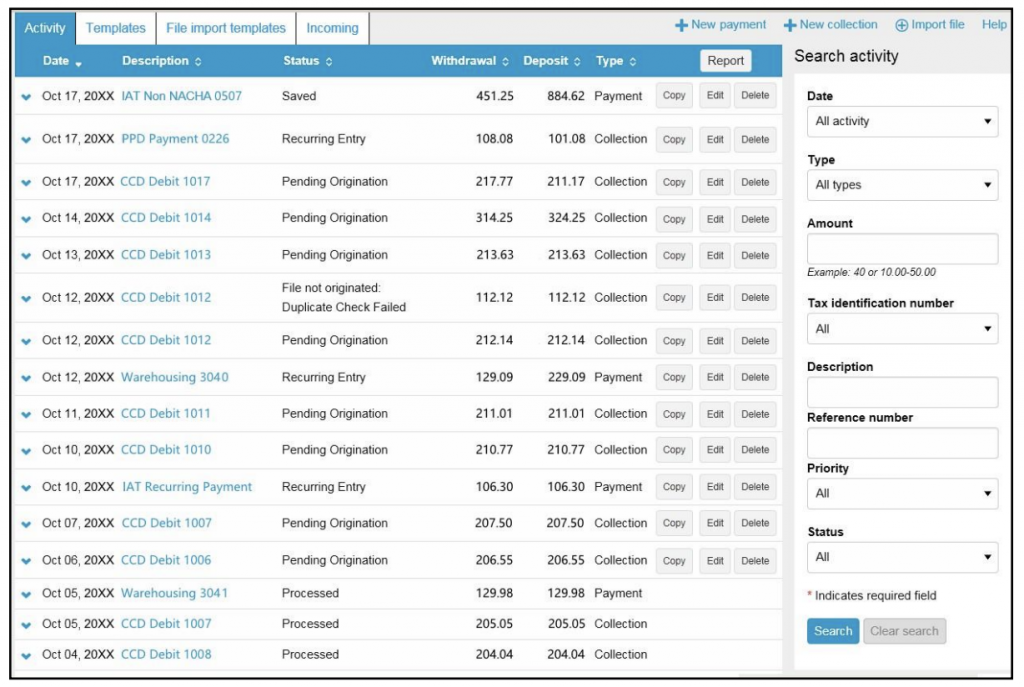
After selecting ACH, the screen immediately presents the most recent ACH activity.
The user interface provides access to more information from a single page including an interactive search and filter capabilities.
Activity
The Activity tab provides a view of transfers. Utilize the search criteria (on the right) or sort features (by clicking the column headers) to quickly find a specific transfer or set of transfers.
The Activity tab provides you with quick and easy access to your transaction history.
Expand and Collapse Transfer Details
Click or tap the up and down arrows next to any transfer to see additional details about the transfer. For example, the reference number, payment type, issued by, issued date, and item count. Simply click or tap to collapse the row.
Click or tap next to any transfer to see additional details about the transfer.
Load More Search Results
The system initially retrieves up to 20 transfers at a time. You can add more results by clicking or tapping on More ACH Activity at the bottom of the page.
Sort
Sort the list of transfers by clicking or tapping next to any column heading. Transfers can be sorted by date, description, status, withdrawal, deposit, or type.
Search Activity
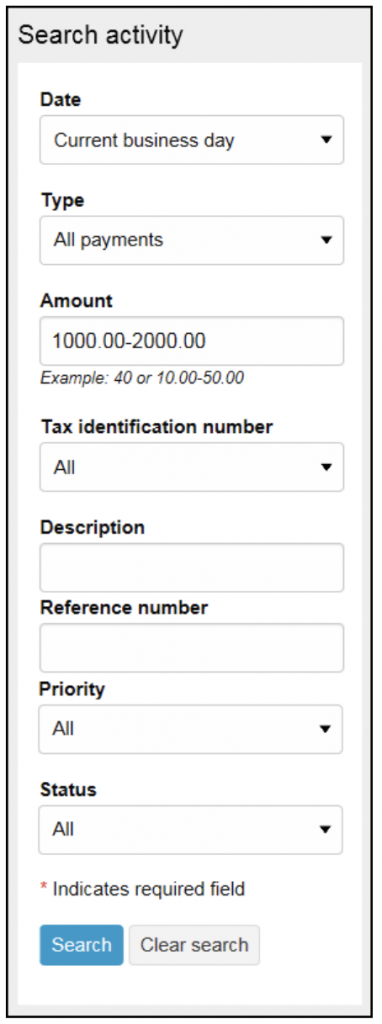
The Search Activity section enables refining the search by defining key search terms, such as date, type, amount, tax identification number, description, reference number, priority, and status.
The search options that display are dependent upon the task that the user wants to accomplish. Example: establishing a transfer or establishing a template.
The Search activity helps you locate information faster.
New, Copy, Edit, and Delete Transfers
New Transfers
All ACH transfers are conveniently grouped into two categories: payments and collections. Within each category, you can access all the types of ACH transfers Example: payroll or pre-arranged payments.
From the main ACH menu, click on + New payment or + New collection to establish a new ACH transfer.
Click the +New payment or +New collection to initiate a new transfer.
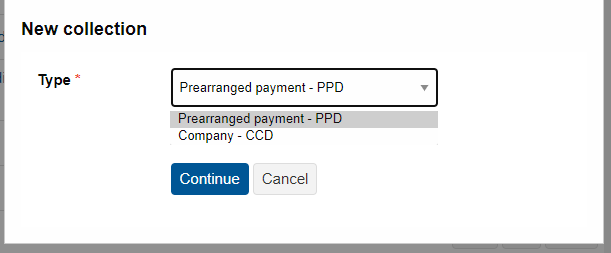
By selecting either option, the system displays a New Payment or New Collection box from which one can specify the correct type of ACH transfer from the Type drop-down list. (If the incorrect option is used, the transfer could be rejected/returned by the receiver.)
- PPD: This is used to pay people.
- CCD: This option is used to pay companies.
Click Continue.
Copy Transfers
If there is an existing transfer that can be reused, simply locate the desired transfer and then click the Copy button to the right of the transfer name.
The system then displays an edit page for the transfer that was copied. Make any changes as needed and rename the transfer.
The system will retain the original transfer and the newly copied transfer.
The Copy button enables you to quickly reuse content from an existing transfer.
Edit Transfers
The ability to edit a payment or collection is easier than ever for transfers that have not completed processing.
From the main Activity tab, click or tap the Edit button for the transfer that requires edits.
Click the Edit button to make changes to a transfer.
Delete Transfers
From the main Activity tab, click or tap Delete for the transfer to be deleted.
The system then displays a transfer overview page. From the transfer overview page, click or tap Delete ACH and the system will complete the deletion process.
Click or tap Delete to initiate the deletion process for a transfer.
User Interface Layout
The system divides the transfer page (for new, copy, and edit transfers) into three sections:
a. Transfer Overview
b. Pay from
c. Pay to
Transfer Overview
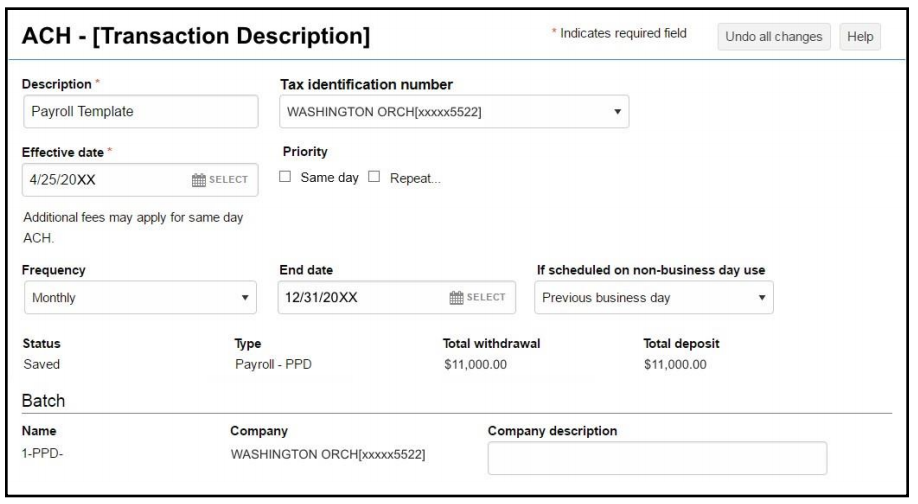
a. The Transfer Overview section enables the following: name the transfer; establish the transfer date, the frequency of the transfer, and the owner of the account.
A sample New ACH – Payroll (PPD) transfer illustrates the transfer overview section of an ACH transfer.
Pay From
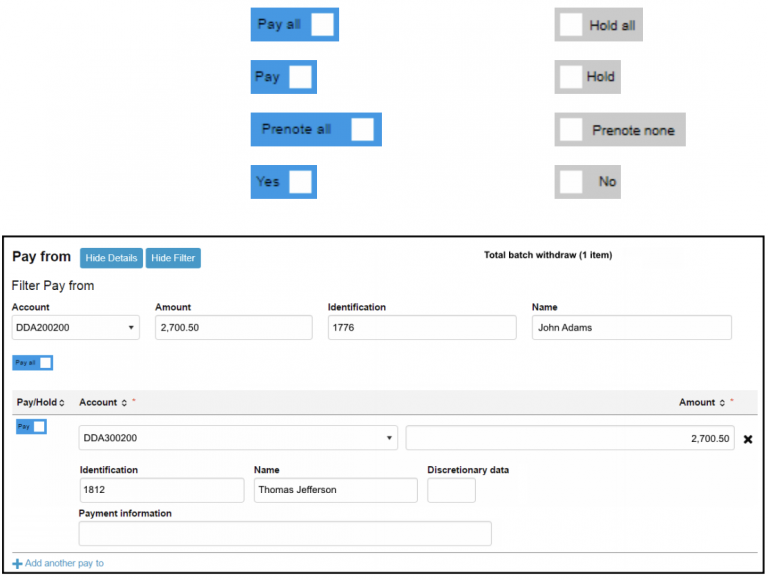
b. The Pay From section provides an overview of where the payment funds are coming from. By clicking or tapping on the Details button, you can edit additional fields, such as Payment information, Identification, Name, and Discretionary Data.
For transfers that contain multiple rows of information, you can click or tap on the Filter button and then sort the results by Account, Amount, Identification, and Name. As you begin typing data into one of these fields, the system automatically starts sorting.
Note: The transfer type determines what additional fields display when you click or tap Show Details and Show Filter.
To place a hold on a transfer, click the Pay switch. A hold stops the system from submitting the indicated transfer to the financial institution during processing and saves the transfer for future use. To remove the hold, click the Hold switch to turn on the Pay option and proceed with processing the specified transfer as part of the batch.
Note: ACH Manager uses switches that change labels when you activate or deactivate the switch by clicking on them. The switches are in the table that follows.
The Pay From section allows you to define where the funds are coming from.
Pay To
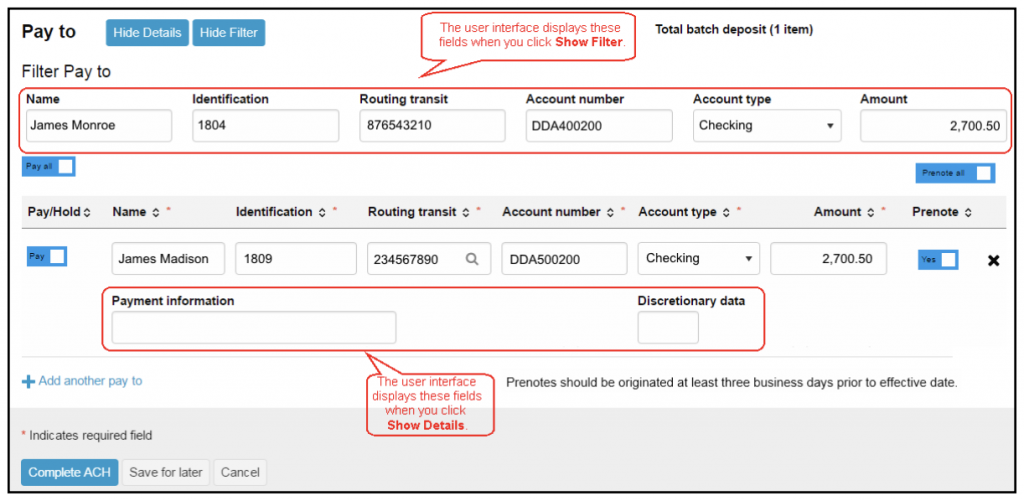
c. The Pay To section provides an overview of where the payment funds are going to. By clicking or tapping on the Details button, you can edit additional fields such as payment information and discretionary data.
For transfers that contain multiple sources of payment, click or tap on the Filter button and then sort the results by name, identification, routing transit, account number, account type, and amount. As you begin typing data into one of these fields, the system automatically starts sorting.
Note: Clicking or tapping on the Show Details and Show Filter buttons changes the buttons Hide Details and Hide Filter and causes the user interface to display additional fields. Clicking or tapping on the buttons a second time will restore the buttons and the user interface to their default setting.
To add a prenote to all payments, click the Prenote None switch to enable the prenote and thereby adding a zero dollar prenote transfer for the current business day. To remove all the prenotes, click the Prenote All switch to turn on prenotes. You can enable prenotes for individual payments by clicking the No switch. You can disable prenotes for a specific transfer by clicking the Yes switch. The system processes the transfer on the effective date regardless if a prenote is sent prior to processing.
The Pay To section provides you with an overview of where the system is sending the payment funds.
Routing Transit Field
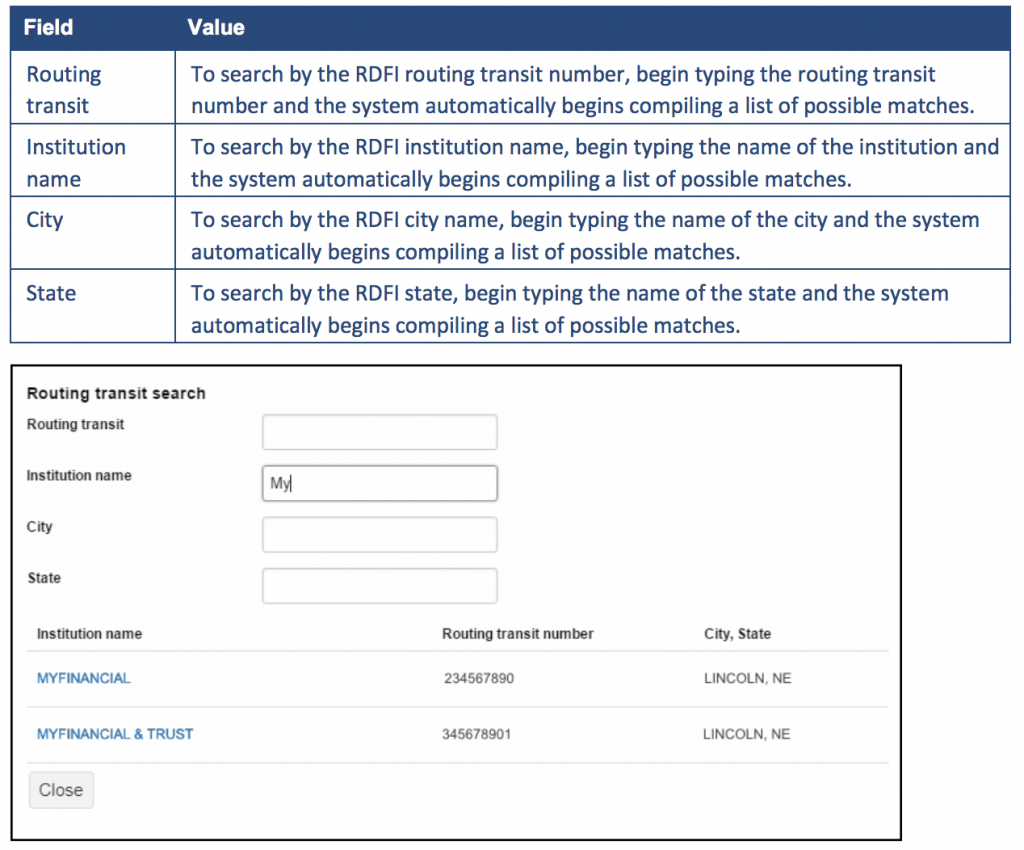
The Routing Transit field has dynamic search capabilities. Click or tap to search for the routing transit number that identifies the Receiving Depository Financial Institution (RDFI). The system opens a new Routing Transit search box. Use the Routing Transit, Institution Name, City, or State fields to search for the correct routing transit number. Once the correct institution is located, click the appropriate institution name and the system will populate the Routing Transit field with the correct routing transit number.
The system automatically starts building a list of possible matches as you type data into any of the fields.
Messages for Processing Transfers
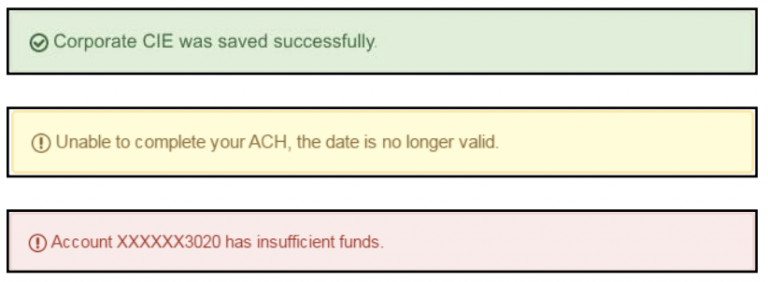
Click the Complete ACH or Save For Later button and the system will display one of three types of messages: success, warning, or error. We list one example of each below.
Note: When the system displays the transfer confirmation page, you have the option to save the transfer as a template by clicking the Save as a Template button. The system then applies the transfer specifications to a template that enables you to reuse the content for future transfers.
The color-coded messages quickly provide you with a visual informing you of the success or failure of the system processing or saving a transfer.
Delete a Recurring Transfer
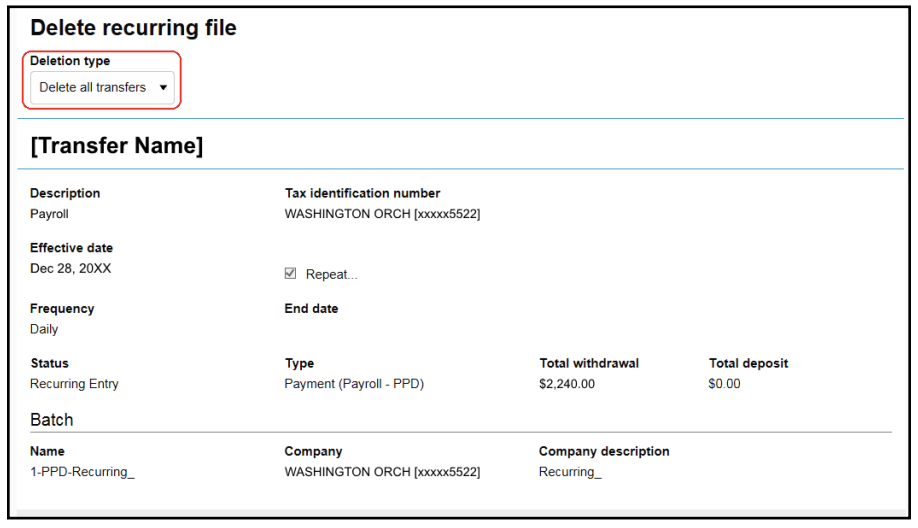
From the Activity page, click on the Delete button for a recurring transfer and the system displays the Delete recurring file page. From this page, a single occurrence or all future recurring transfers can be deleted from the Deletion Type drop-down list.
Quickly delete a single occurrence or all future recurring transfers.
Templates
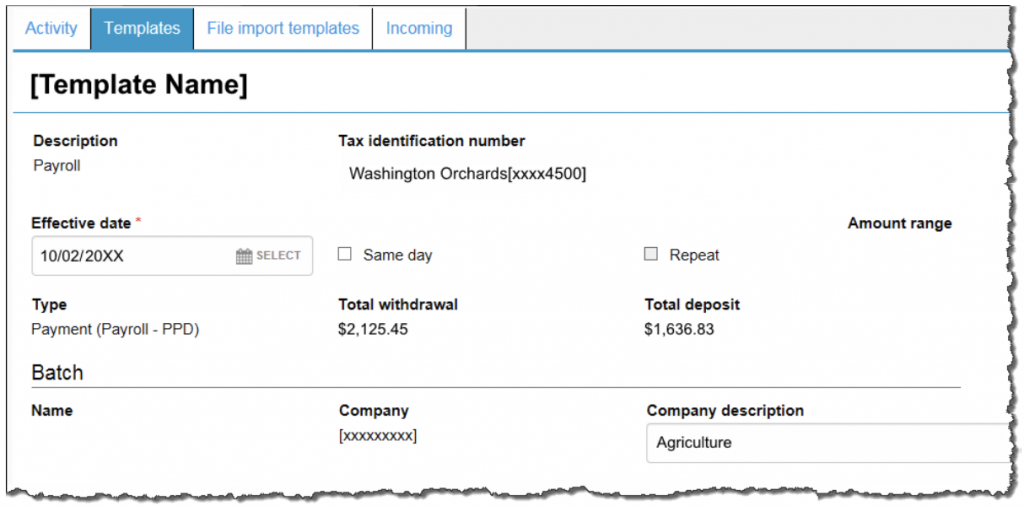
When or If a transfer is submitted for review, the system will display the transfer confirmation page. From the confirmation page, the option is presented to save the transfer as a template by clicking the Save As a Template button, making it easier to establish a new template and reuse content for future transfers.
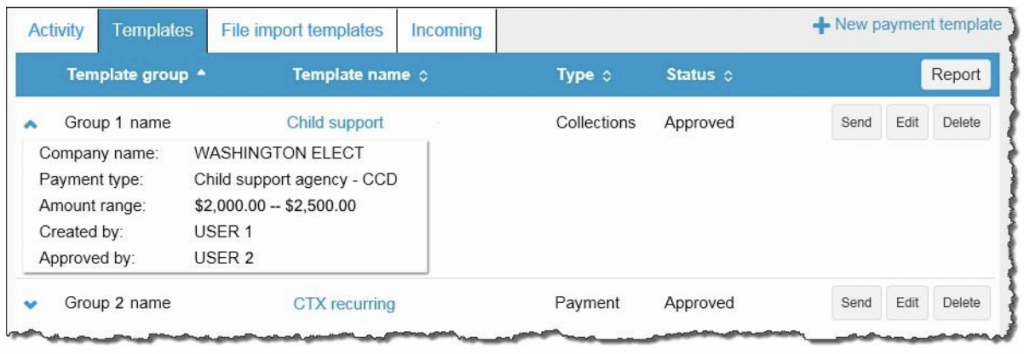
Click the Template tab. Click on + New payment template or + New collection template to establish a new template. In addition, there are options to edit or delete existing templates, and process transfers using an existing template.
The new template list provides more options from a single page.
Template Details
Click to view details about a template, such as company name, payment type, amount range, created by, and approved by.
Click to view details about a template.
New Transfers from a Template
When selected, the template option will display all existing templates and new templates can be created or edited as well. Use a template to establish a new transfer by clicking the Send button for the specified template.
Click the Send button to begin establishing a new transfer from a template.
File Import Templates
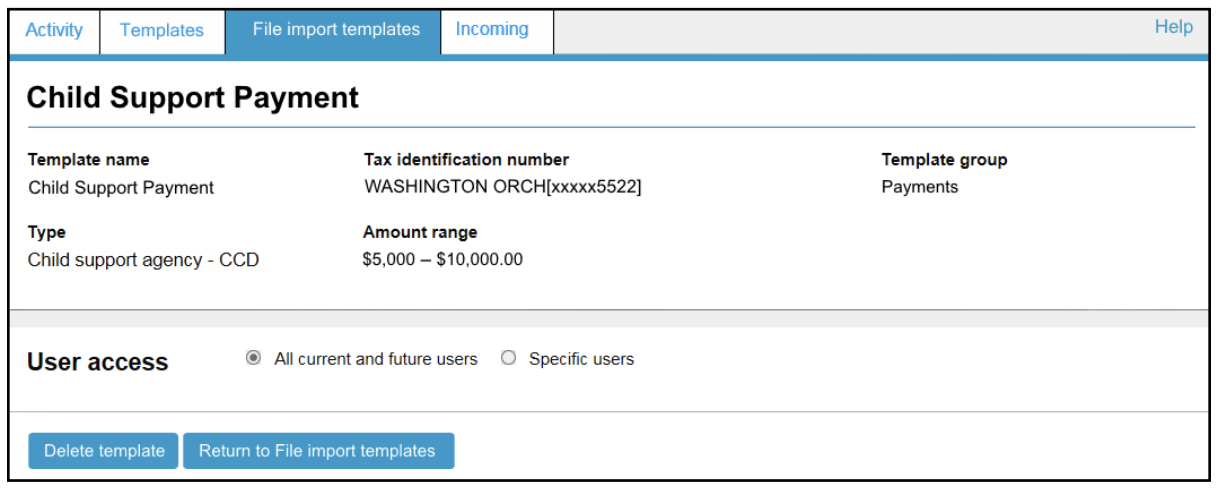
The File Import Templates tab allows quick access to imported templates. Click the arrow to view the company name, payment/collection type, created by, and approved by information for a specific import template. Click on the template name hyperlink to inquire about the import template.
Accessing your File import templates are easier than ever when you use the File import tab.
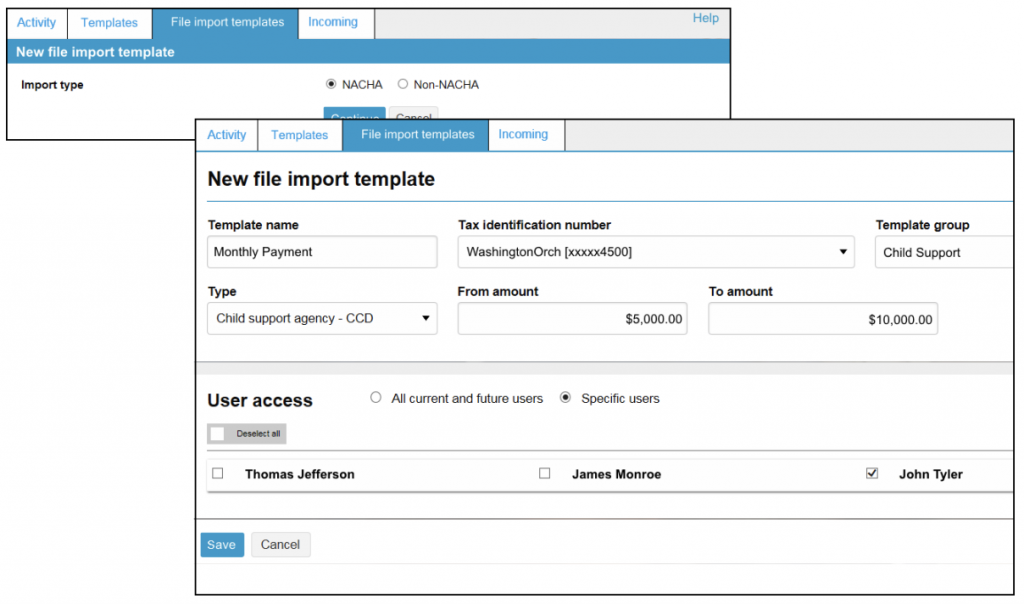
Click + New file import template to establish a new import template for NACHA and non-NACHA files. Once you specify the type of file, you can define all the required fields for establishing the import template.
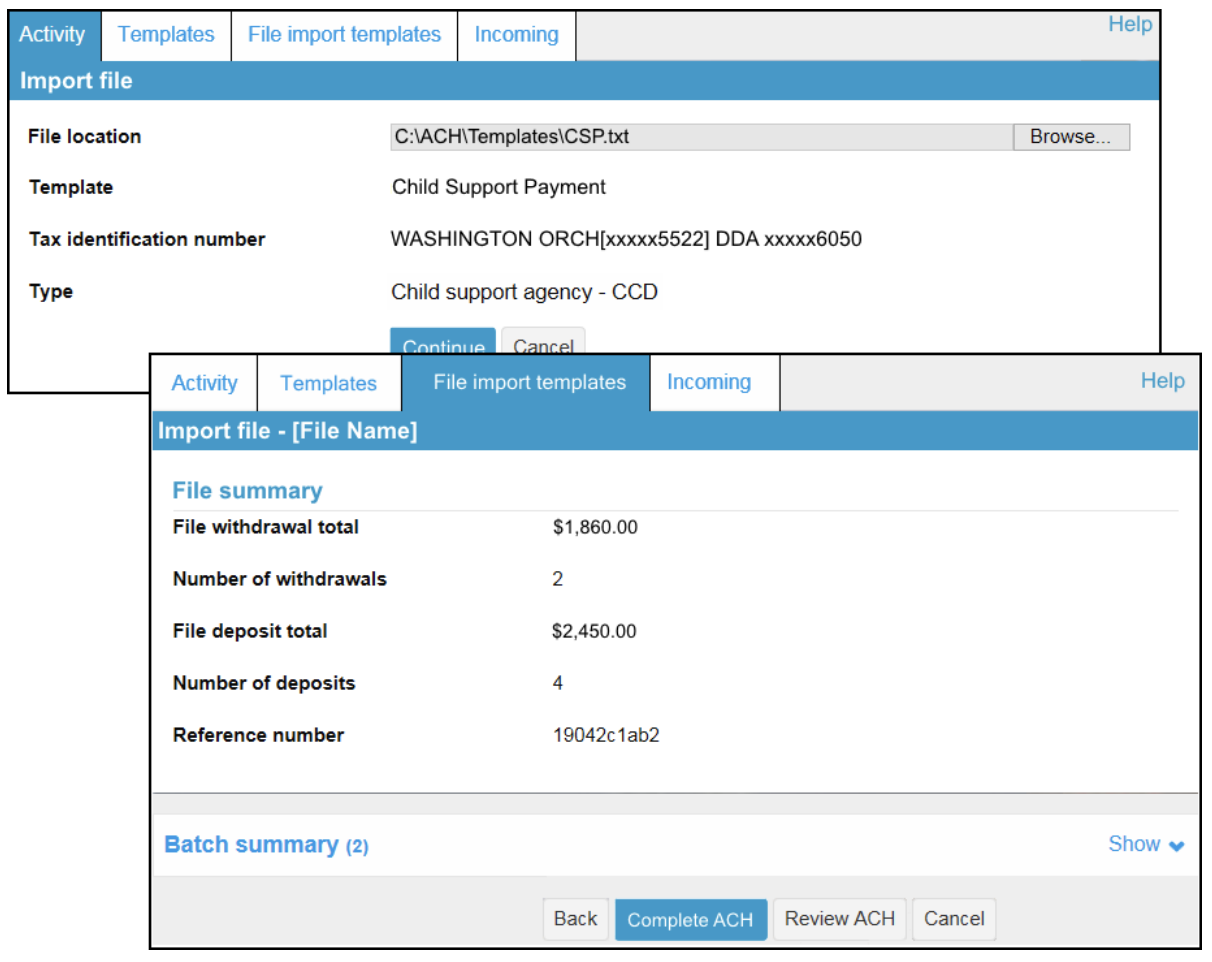
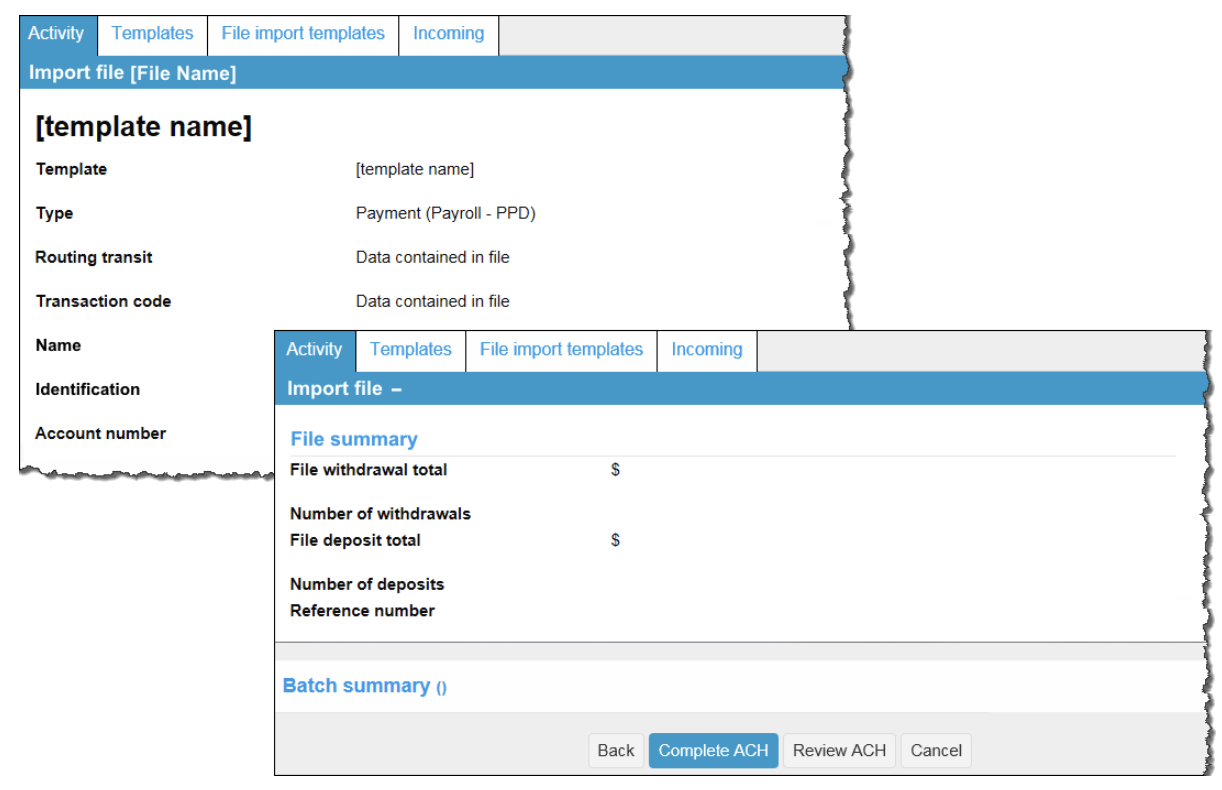
Click Send from the main File Import template list to import a file and establish a transfer using the specified template. Click Continue and then Complete ACH to process the import file.
Note: Click Review ACH to access the review transfer page and make edits.
Click Complete ACH to process the transfer.
Exceptions
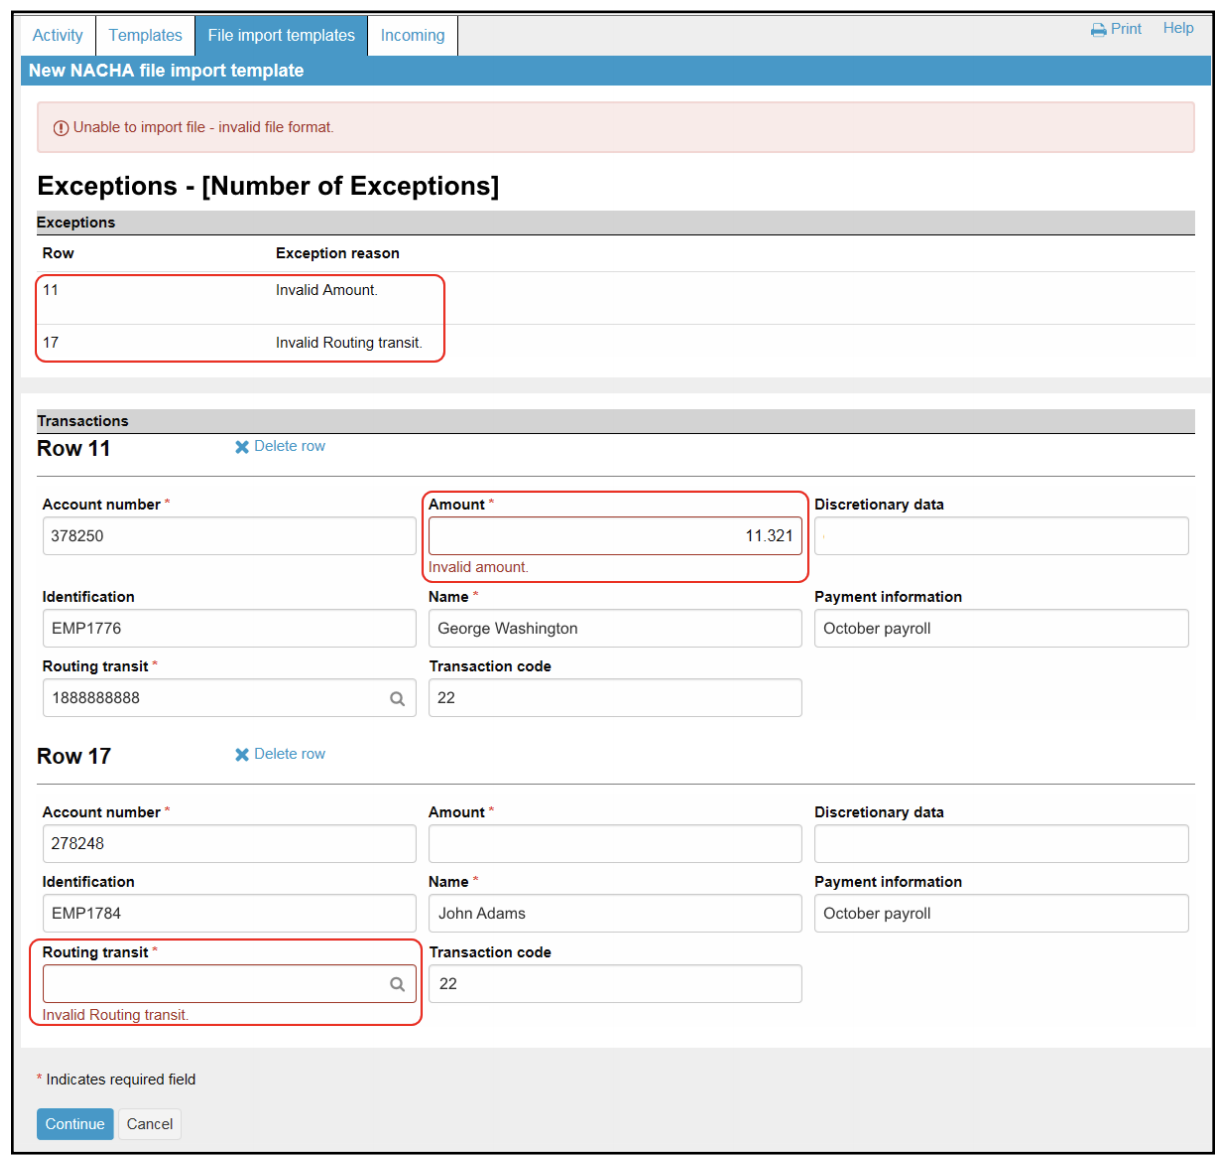
The system displays the Exceptions page when a non-NACHA file is imported and data in the file is missing or inaccurate.
Example: The dollar amount has the decimal too far to the left or the routing transit number is invalid. Correct any exceptions and then click Continue so the system continues with the import process.
The Exceptions page allows errors to be fixed within the data from a non-NACHA file that you import.
Edit or Delete Imported Files
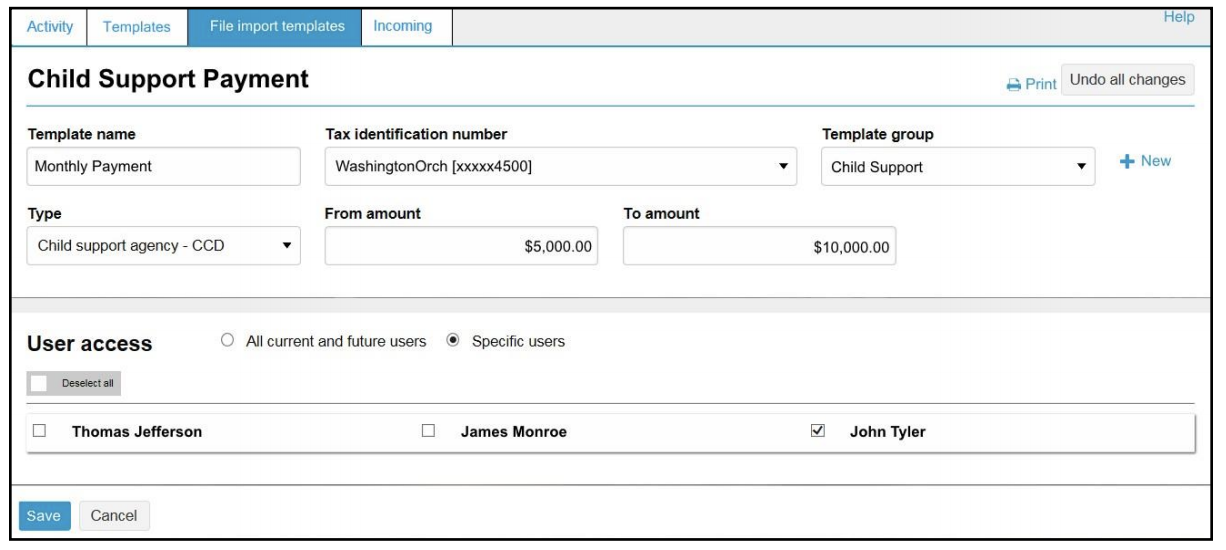
Click Edit from the main File import template list to quickly apply changes to the file import template.
The Edit button enables you to quickly make changes to a file import template.
Click Delete from the main File import template list followed by Delete Template to quickly delete a template that you no longer need.
Quickly delete file import templates using the File Import Templates tab.
Reports
Quickly generate PDF or CSV reports by clicking the Report button.
Click Report to initiate the report options.
Transfer Reports
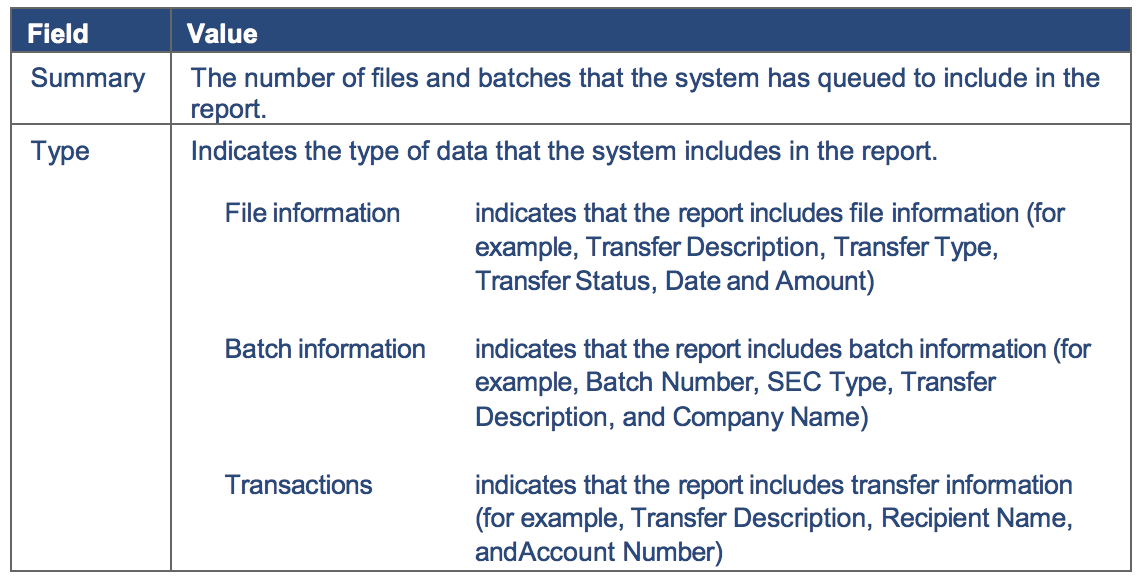
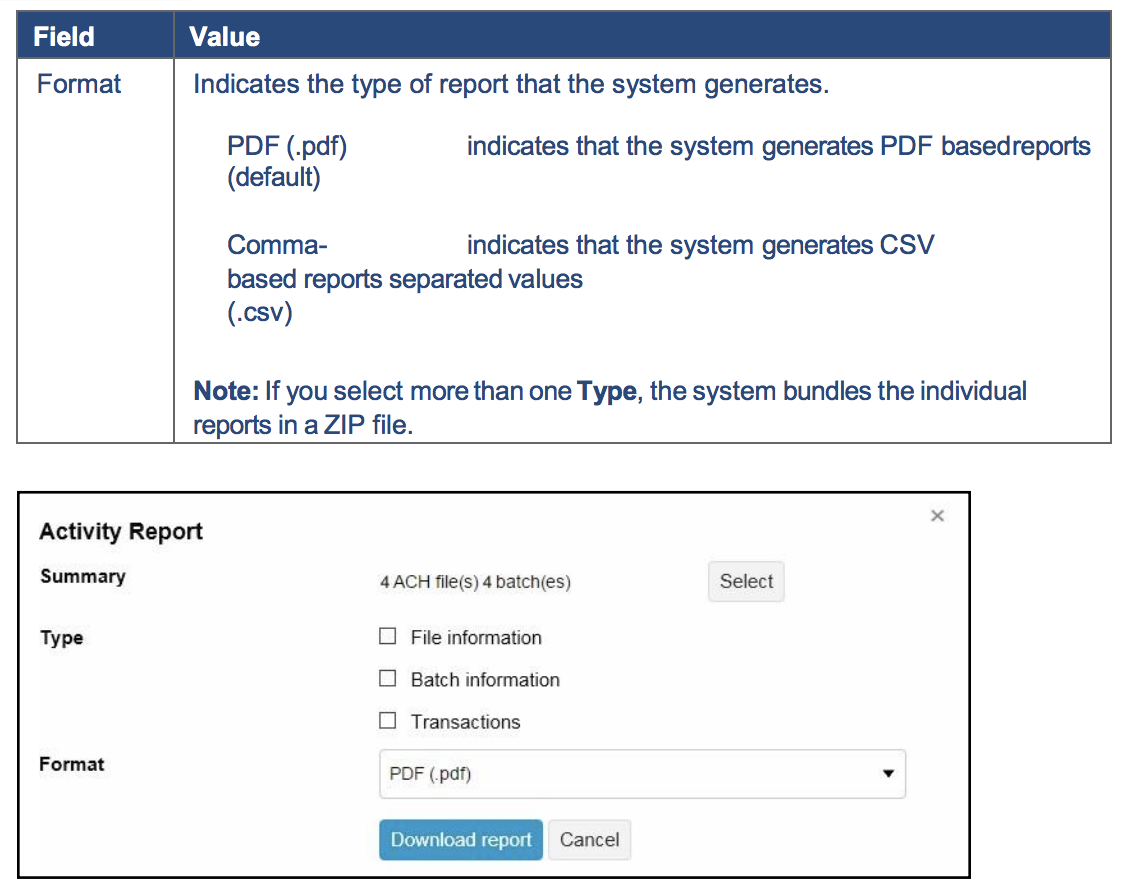
Click the Report button from the Activity page. The system will open up the Activity Report box. From the Activity Report box, fine tune the report and decide which pieces of information the system will include when the report is generated.
Note: The system will retain the last six (6) months of history for completed ACH transfers. It is recommended that you print any needed reports each month.
Use the Activity Report box to select the report format and the type of data to include.
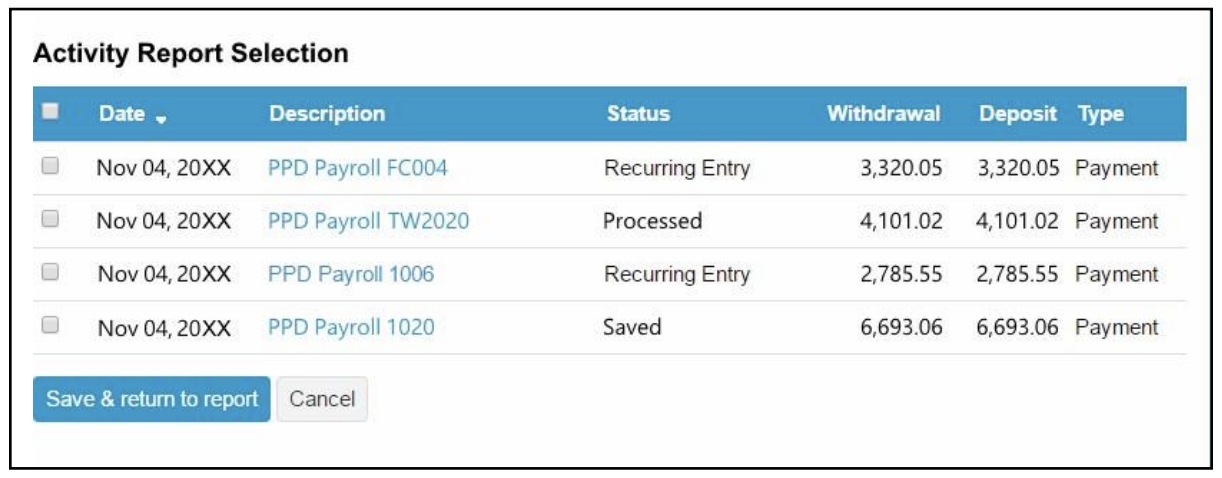
Click the Select button to open the Activity Report Selection box. The Activity Report Selection box allows the selection of specific transaction activities that the system should include in the report.
Use the Activity Report Selection box to specify which transactions to include in the report.
Sample PDF and CSV Transfer Reports
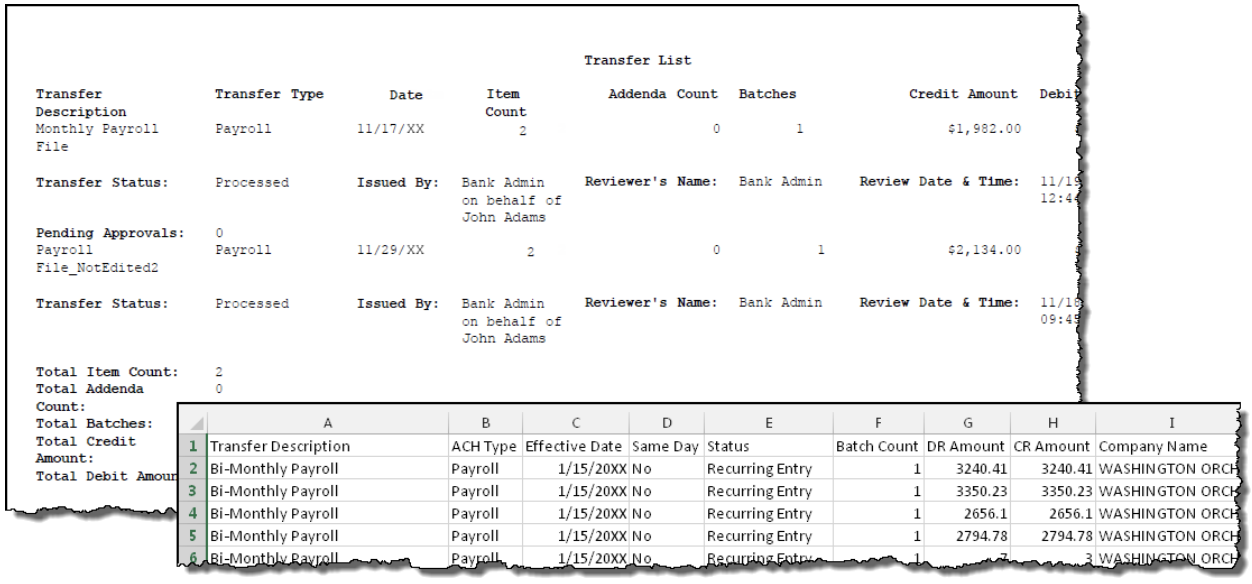
Generate sample PDF or CSV reports to view details about ACH transfers.
Template Reports
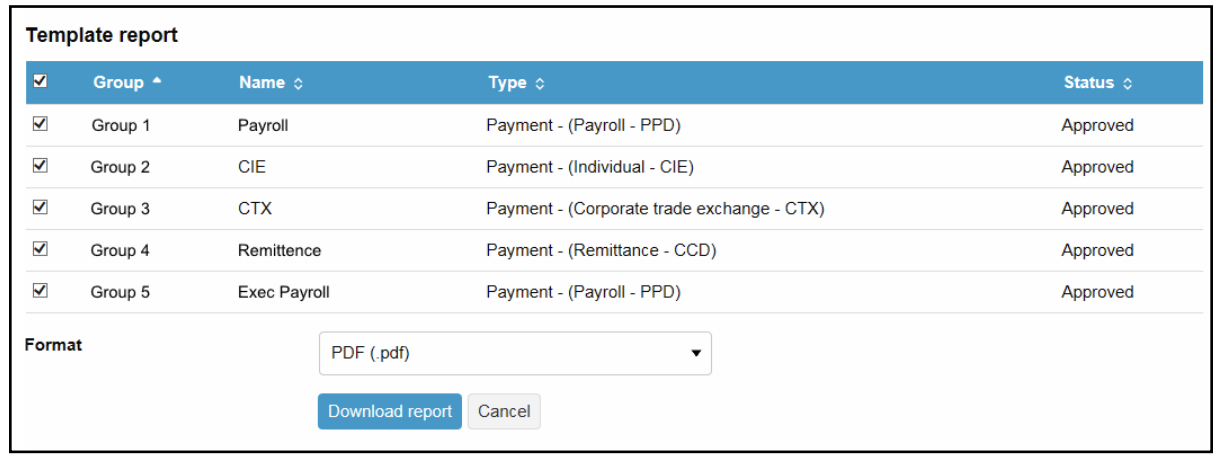
Once selecting the Report button from the Templates page, the system opens up the Template report box. Once all selections are made, choose either PDF (.pdf) or Comma-Separated Values (.csv) from the Format drop-down list and then click Download Report.
Generate PDF or CSV-formatted template reports.
File Import
Access the import NACHA and non-NACHA files functionality directly from the main ACH Activity page by clicking Import File.
Import NACHA Files
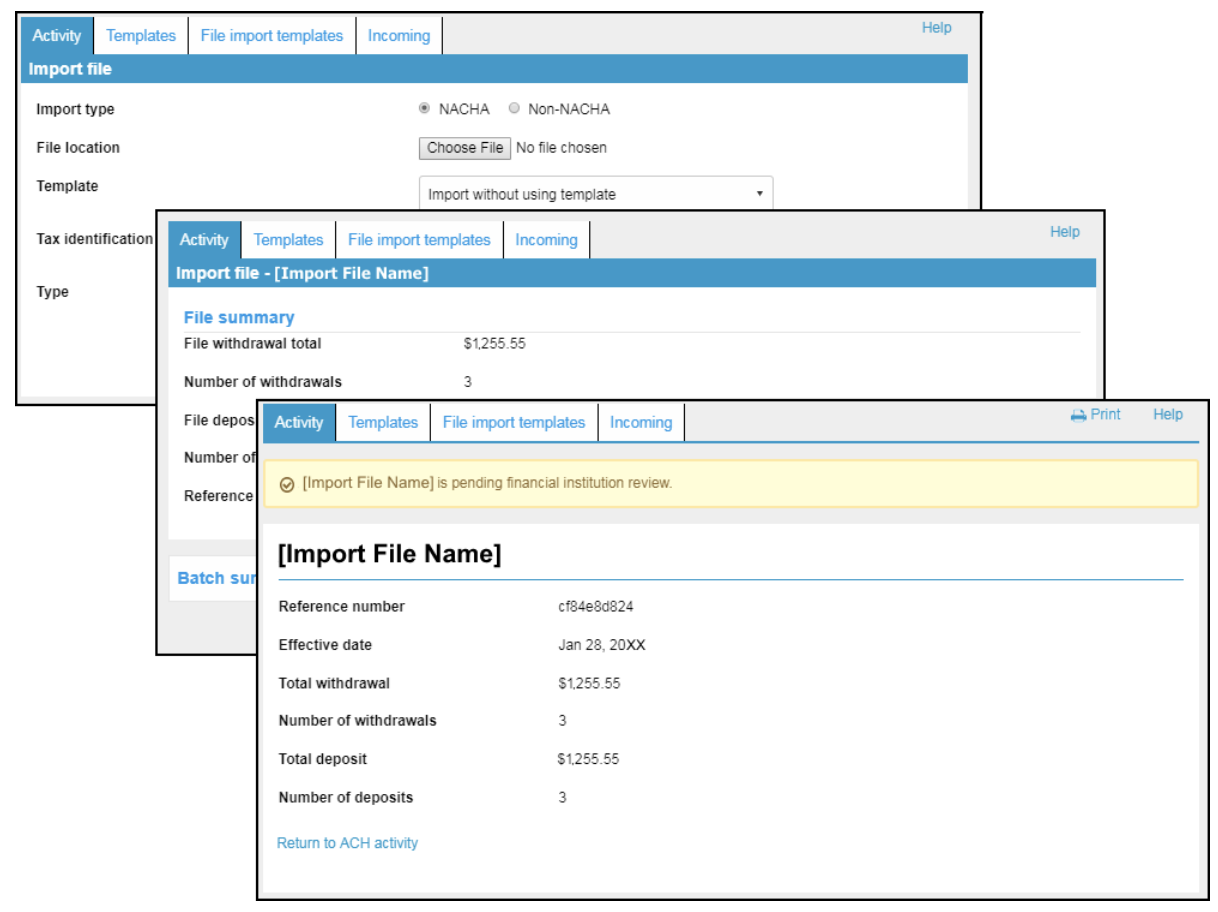
Click Import File and select NACHA or Non-NACHA, then browse to select the appropriate file to import. All NACHA files must be tested by Business Solutions to ensure a successful import.
Importing a NACHA file is a quick three-step process.
Import Non-NACHA
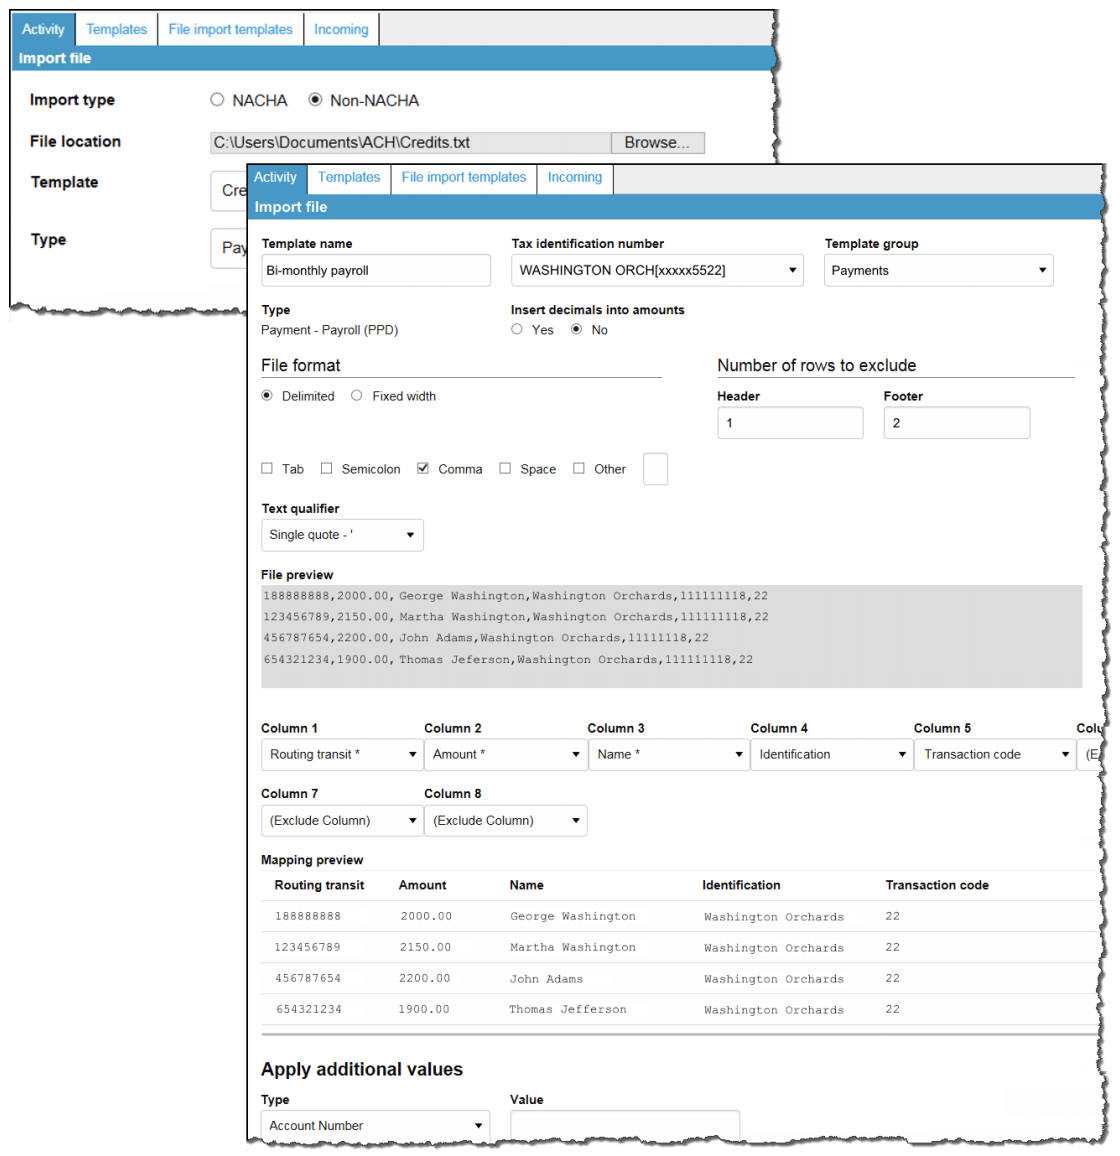
The system automatically populates additional information in the File Format section, such as Delimited (and associated type) or Fixed Width, Header, and Footer rows to exclude any Text Qualifier (if there is one). Also, as each column is defined in the File Format section, the system displays a Mapping preview.
The File Format section reduces the number of steps that you need to take when importing a non-NACHA file and provides a mapping preview.
Once the data mapping and file summary has been reviewed, complete the import process by clicking Complete ACH.
Importing non-NACHA files is easier than ever.
Payments & Transfer Review (Approval Workflows)
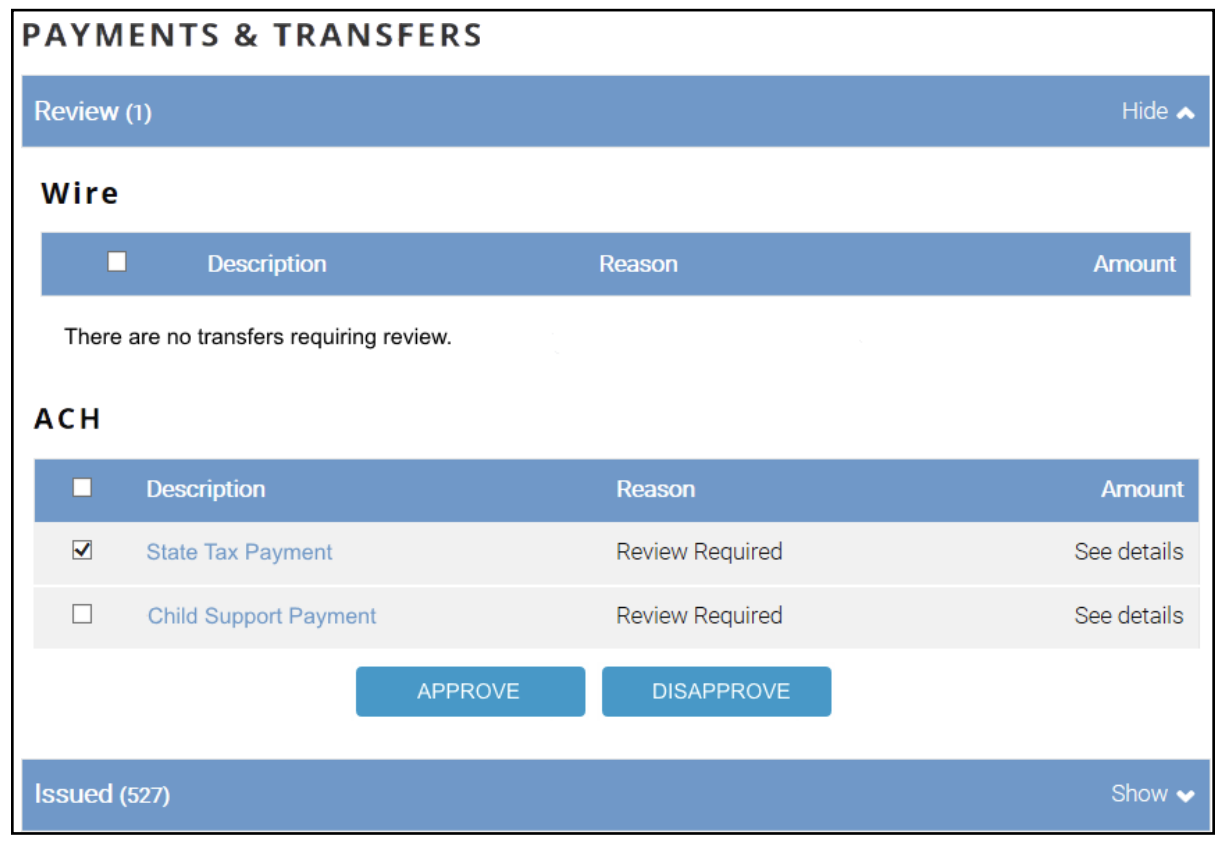
The process of reviewing ACH transfers shows on the Business Advantage Home Page.
To view details of a transfer prior to approving it, click the description for the transfer and the system expands the page to display the details.
Approve or disapprove multiple transfers at once by selecting individual checkboxes or select all transfers for approval or disapproval by selecting the Description check box and then clicking the appropriate Approve or Disapprove button.
The Payments & Transfers widget for ACH is the single access point for reviewing and approving ACH transfers.
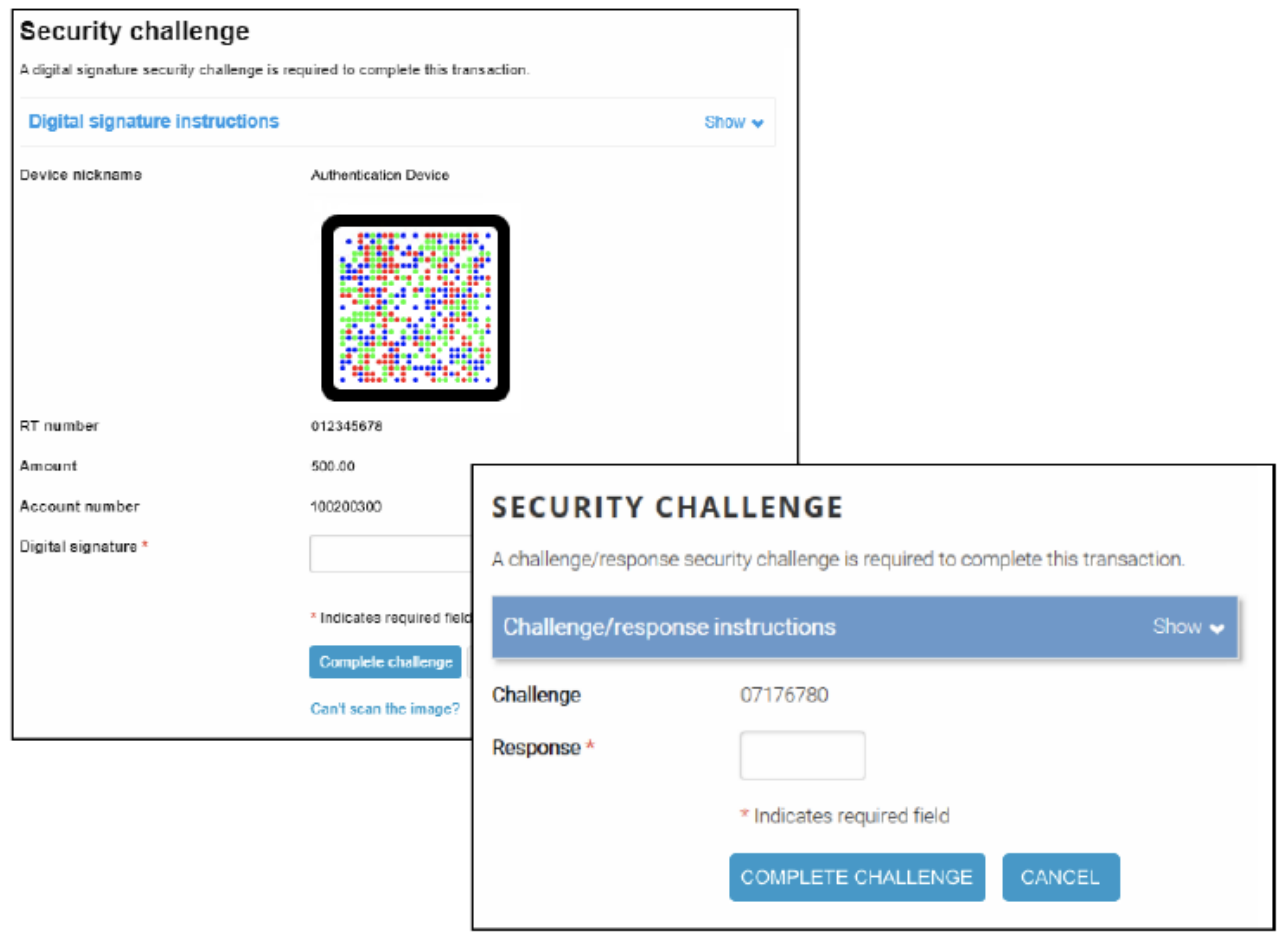
After clicking Approve or Disapprove, the system displays one of the following Security Challenge boxes (if this was requested to be set up). The displayed security challenge depends on the Multifactor Authentication security settings specified for each customer (hard token, soft token). Once credentials are input, click Complete Challenge to approve the transfer.
Type your security token credentials to approve the transfer.
Template Review
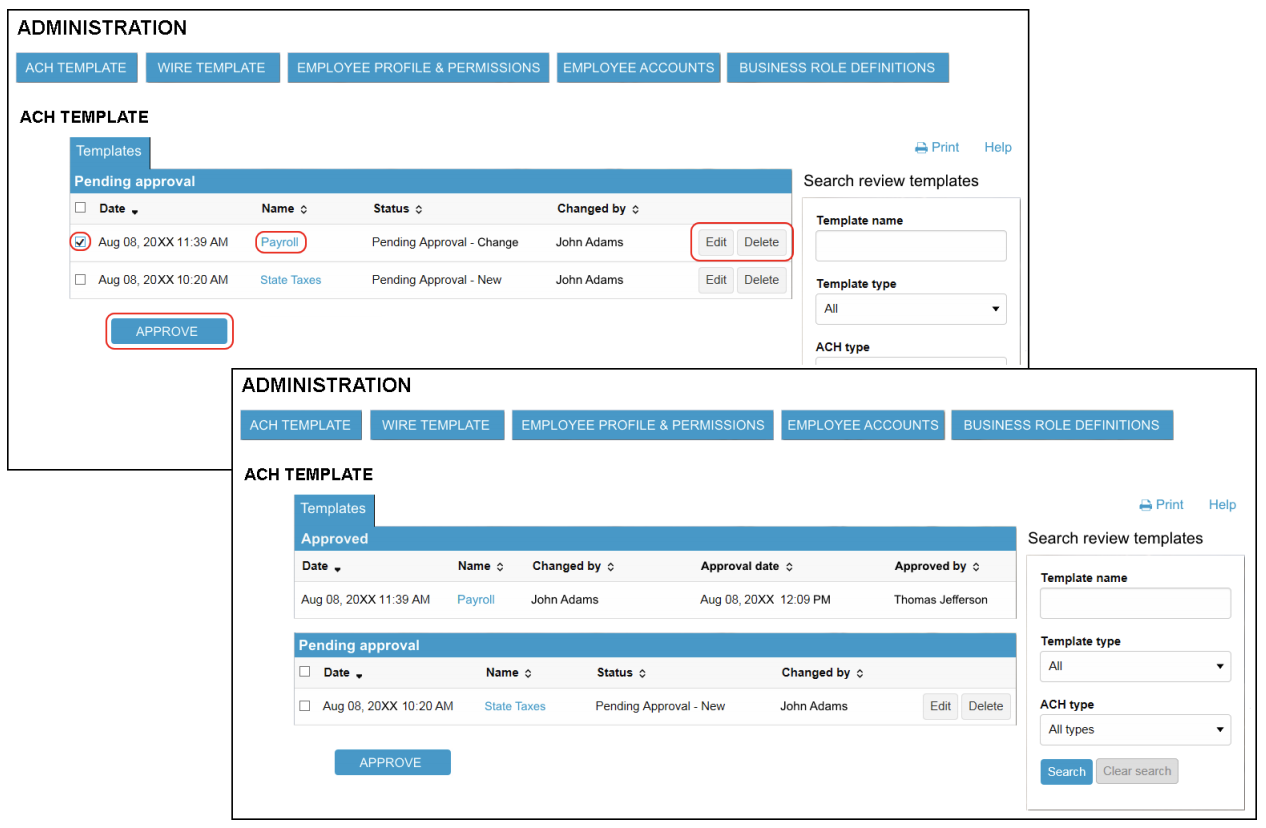
Review new templates or changes made to templates using the Administration option on the Business Advantage Home page. Navigate to the ACH Template review page and several options are presented:
- Click on the Name hyperlink for the template to see details about the template.
- Click Edit to make additional changes to the template.
- Click Delete to delete the template.
- Select the appropriate check box for the new or modified template and click Approve. The system then updates the page to show which templates were approved and which ones are still pending approval.
The ACH Template review page enables you to quickly inquire on, edit, delete, or approve templates, if applicable.
Change Effective Date Warning for Multi-Batch Files
In a multi-batch file, if dates are invalid (either too far in the future or past), the warning message is displayed and the system does not process the transfer until a “yes” or “no” decision is selected.
The system provides the user with the option to either correct the dates or to cancel the transfer.
View Our Other Resources
Get access to other helpful guides, demos, and additional resources
to make banking with Fidelity Bank even easier.


