

Remote Deposit User Guide
Save time and money by making deposits easily online using a desktop scanner. Getting started with Remote Deposit is easy.
Getting Started
Open an internet browser and visit the Fidelity Bank website. Then click on the blue Log In button in the top right corner, select the Log in to other systems drop down box, and click the Remote Deposit Login option.
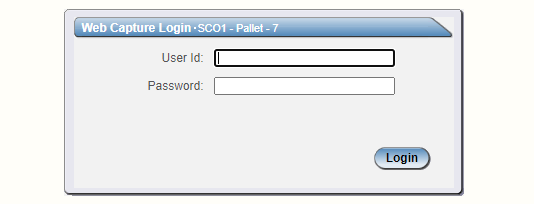
Enter your User ID and password, then click the Login button.
Note: Only U.S. currency check can be processed. All foreign currency checks and all cash must be deposited at a branch. You do not need to endorse checks or complete a deposit slip when using the remote deposit service.
Deposits must be submitted by 7:00 PM Eastern Time to receive same-day deposit credit. For technical support, please call 1-855-547-1385 and select option 3 or email businesssolutions@fidelitybanknc.com.
See instructions for specific tasks below.
Creating a Deposit
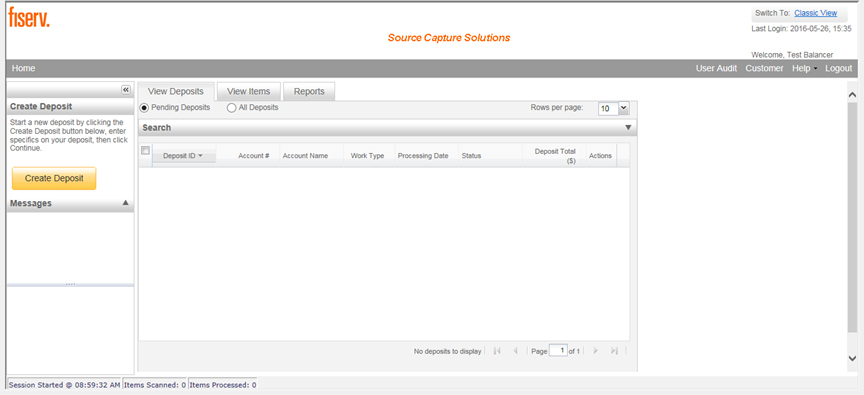
Once you are logged in and using the Contemporary View, you will be directed to the landing page. Click Create Deposit.
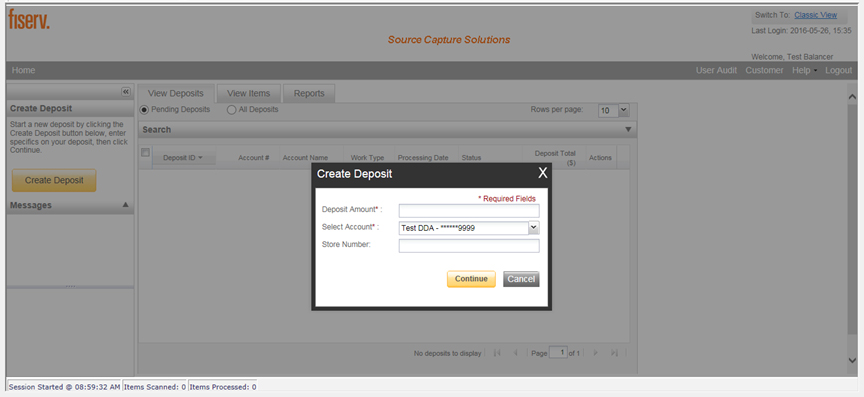
Wait for the Create Deposit prompt to appear. Then follow the steps below:
- Enter the deposit amount
- Select the account number of the account you want to be credited.
- If applicable, fill in the store number. This is seldomly used unless needed for tracking purposes.
- Click Continue. You will be directed to the scan screen.
Scanning Your Deposit
When scanning checks, limit the number of items to 400 or less in a single deposit. Make sure checks are neatly stacked before placing them in the hopper. If you are using a multi-feed scanner (TS230 or TS240), sort checks into groups of 25. If you are using the single-feed scanner (CX30), place checks into the hopper one at a time.

Once check(s) are loaded into the scanner and the scanner light is orange, click the Scan button. Continue scanning checks until all have been scanned. Verify the last item on the screen matches the last item in the scanner pocket.
Submitting Your Deposit
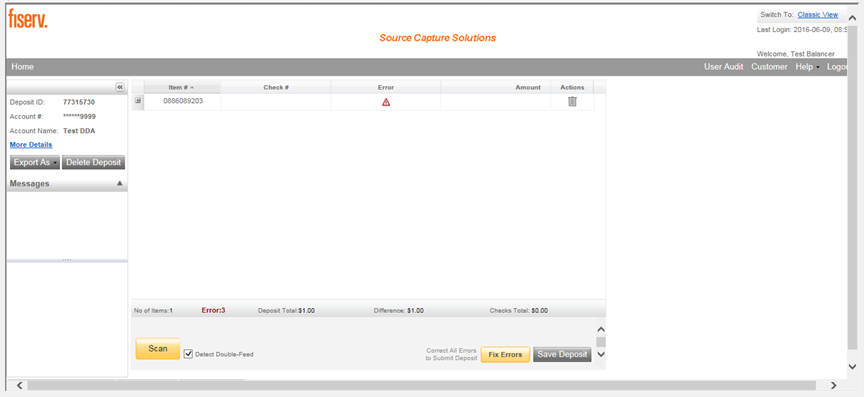
You must fix all exceptions before submitting your deposit. If there are exceptions, two things will happen: a yellow button will appear at the bottom of the checklist that reads Fix Errors, and a red triangle symbol will appear in the error column of the check that needs your attention. Follow the instructions below to process exceptions. Once all errors are fixed, the Fix Errors button will disappear and display as Submit Deposit.

Once all checks are scanned, verify your totals. Your deposit total should equal your checks total, making your difference zero. If your difference is zero, click the Submit Deposit button.
If your difference is not zero, review the deposit to verify that all checks were scanned and that the amounts captured are correct. If necessary, complete the following:
- Scan missing items at the end of the deposit.
- Correct or fill in any check information (account number, routing number, etc.).
- Fix any amounts that are incorrect.
- Delete any unintended items.
Printing Your Receipt
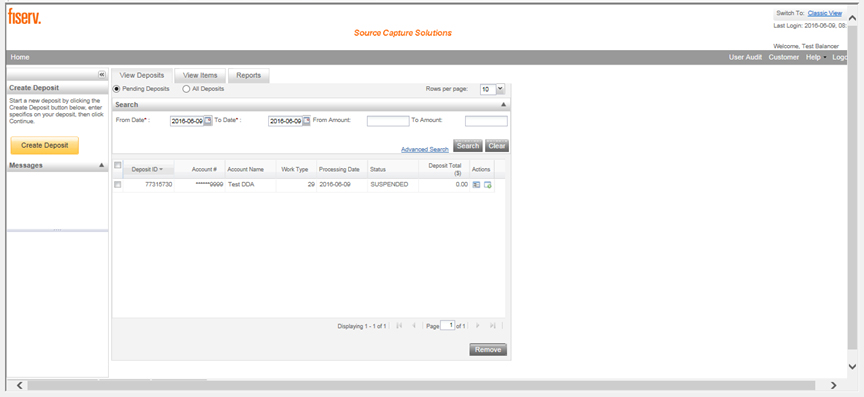
Once you have submitted your deposit to the bank, you are directed back to the main landing page. This page currently defaults to the current day’s pending deposits.
To see all deposits for the current day, click the All Deposits radio button. Then, find the deposit you need a receipt for and click the View Deposit icon in the Action column.
Once your screen loads, click on the Export As button. You are given several receipt options: PDF, CSV, PDF With Images, and Extract Images. Select your desired option and print or save to your device.
Processing Exceptions

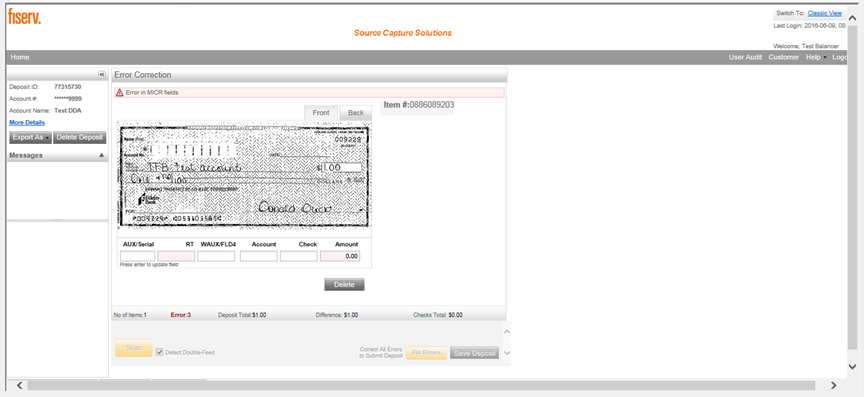
Click the Fix Errors button to load the first item that needs your attention.
This screen will take you to the first MICR exception or image quality assessment (IQA) exception to be corrected. The software will guide you through each field to be corrected. Exceptions will be cleared from the screen as they are resolved. When all MICR and IQA exceptions are resolved, the software will check for duplicate exceptions. Follow the detailed procedures below for handling MICR, IQA, and duplicate exceptions.
MICR Exceptions
The cursor will move to each field requiring correction, which will be highlighted in pink. At the top of the screen, there will be an accompanying error message in RED. Key the missing or incomplete value according to what you see on the document and click the Enter key on your computer’s keyboard. If you cannot read the document, click the image to enlarge it.
IQA Exceptions
If an item fails image quality tests, it will be flagged with an X in the Image Quality column. Review the image to determine if it needs to be rescanned or is acceptable. For each IQA exception, take one of the following actions:
- Accept the image. If the image is completely legible, click Accept Image.
- Rescan the image. If the image needs to be improved (e.g., if it is crooked or upside down), place the check in the scanner and rescan. You will receive the warning, “Do you want to rescan image for selected item?” Click Yes. The MICR will be compared with the original check. If there is a difference, you will receive a warning message. If you are certain you are rescanning the correct check, select Yes. At times, rescanning will not improve the image and it will continue to be flagged as an IQA exception. If all of the important information is legible, you may click Accept Image. If the image cannot be improved and is still hard to read, try one of the following:
- Make a photocopy, cut the copy out, and scan the copy. When you are finished, staple the copy to the original for storage.
- If everything is legible except for the amount (e.g., postal money orders), you may write the amount on the check in a blank area, rescan, and then accept the item.
- Delete the image. If the image is illegible, verify the image displayed is the item you want to delete, click Delete Item, and physically remove the item from the deposit. Deleted checks remain visible, but the data is grayed out. Take any deleted checks to your branch for deposit.
Item Piggybacks
If you discover that two checks have run through the scanner together (“piggyback”), find the checks in the scanner exit pocket, delete the piggyback record, and scan these checks at the end of the deposit.
Duplicate Exceptions
When all exceptions are corrected, the software will check for duplicates. If any are found, a Duplicate Item Detection error message will appear.
This screen will display the images suspected to be duplicates side by side with the current item on the left and the previously scanned item on the right. Data pertaining to the previously scanned item will be displayed beneath the image. If multiple suspected duplicates are found, page through the previously scanned items using the arrow buttons.
Determine whether the item is a duplicate and click to accept or delete. If multiple duplicates are detected, the service will automatically take you to the next item needing your attention.
Processing Exceptions
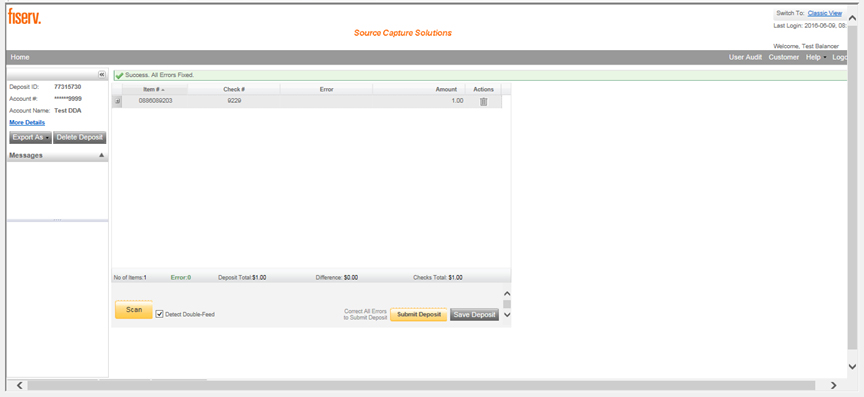
Once all exceptions are cleared, you can click Submit Deposit.
Please remove the items listed below from your deposit and take them to your branch to deposit. They will create exceptions and therefore cannot be processed electronically.
- Savings bonds
- Canadian checks in US dollars
- Foreign items
- Items with low image quality (Checks that are not legible, too dark, or too light)
Maintenance
Periodically, you may need to clean your scanner. If you begin having numerous reading errors, here are a few things you can try:
- Remove the cover of the scanner and clean out the check track using a can of compressed air. This will remove any paper particles in the scanner itself.
- Run a cleaning card through the scanner as if it is a check. This is a moist piece of paper which cleans the rollers and track of the scanner. These can be picked up at a local branch.
Replacement Ink Cartridges
The cartridge that comes with the scanner should last for several hundred checks. When you can no longer see the “Electronic Deposit” on the back of the check, it is time to replace the cartridge. The cartridge is a standard ink cartridge (the number is located on the cartridge) and can be purchased or ordered from any office supply store. You may also buy it directly from Digital Check at www.digitalcheck.com.
When replacing the cartridge, if you do not have the cartridge locked in place properly or if the cartridge is crooked, you will receive a Hardware Error 21 message. Remove the cover and make sure the cartridge is locked into the correct position and straight.
Annual RDS Questionnaire
The FDIC requires that all banks monitor remote deposit customers on an ongoing basis. This monitoring helps banks ensure customers are following the guidelines put forth in the signed original remote deposit agreement. A brief questionnaire will be emailed each summer to all remote deposit customers for completion and signatures. This questionnaire will be emailed to the address Fidelity Bank has on file in the remote deposit system.
Other Helpful Tools
How to Query for Items Previously Processed
On the main landing page, expand the search fields by clicking the gray down arrow. Enter in your search criteria and click the Search button.
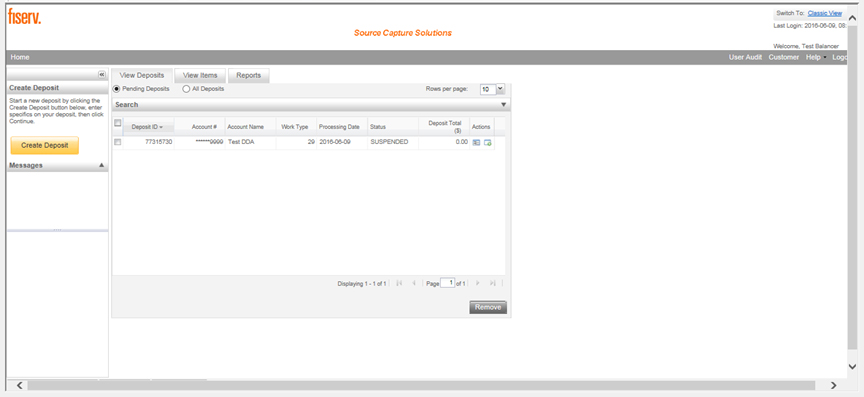
Deposit Status Definitions
- Open – A deposit is placed in Open status when it is newly created and when a capture operator has reopened a deposit to add additional items or resolve exceptions.
- Uploading – A deposit that is in the process of uploading items.
- Suspended – A deposit will remain suspended if the operator selects Cancel instead of Capture Complete. Exceptions can be repaired. Balancing cannot be performed.
- In Use – This is a deposit that is in use by your bank or another operator. No actions are allowed on this deposit while in use.
- Ready for Approval – This deposit has all exceptions repaired and is ready to submit.
- Rescan – Not applicable at this time.
- Submitted – This deposit is approved and ready for processing. No further actions will be allowed on this deposit.
- Delivered – This deposit has been delivered to the bank for processing.
View Our Other Resources
Get access to other helpful guides, demos, and additional resources
to make banking with Fidelity Bank even easier.